Friday, July 29, 2011

Foodie Friday: Cabbage Rolls

Red Cabbage Rolls
Several months ago I saw a recipe for cabbage rolls, but honestly, they looked unappetizing to me.  However, they stuck in my mind.  As I was searching for new recipes to try more recently, I stumbled on cabbage rolls again, but this time I saw them wrapped in red cabbage. Suddenly, they looked 100 times better, and I was ready to try them.  While the recipe sounded good, I have to admit that I wasn't sure my family would go for them.  I tried them anyway, and I'm glad that I did.  We all loved them!  Don't judge a cabbage roll by it's cover, right?  This one will stay on as a regular in our household.  The original recipe actually uses a pressure cooker, but since I don't have one (yet), I prepare them in the oven. It takes a little longer, but they still taste great.  If you try them, let me know what you think.    


Red Cabbage Rolls
Adapted from:  Everyday Paleo

{Print this recipe}
Ingredients for Sauce:
1 can (14.5 oz) diced tomatoes, drained
1 cup chicken broth, preferably reduced sodium
3 Tbsp fresh basil, finely chopped (or 1 Tbsp dried)
Black pepper to taste

Ingredients for the Cabbage Roll Filling:
1 lb lean ground beef
2 cups fresh spinach, chopped
1 small apple, finely chopped
1/2 small red onion, finely chopped
4 garlic cloves, minced
2 Tbsp Italian parsley, finely chopped
1 whole egg (or 1/4 cup chia gel - I've used this to make this dish egg-free, and it works just fine.)
1 tsp paprika
1 tsp salt
1 tsp freshly ground black pepper
12 cabbage leaves (from cored cabbage)

Directions:
1.  Preheat oven to 350F.
2.  Combine the sauce ingredients in a large bowl and set aside.
3.  Place the cabbage leaves in a vegetable steamer, about 4-5 minutes.  (I use my bamboo steamer.)  Remove the leaves from the steamer and set aside to cool.
4.  Mix together the ingredients for the filling in a large bowl.  Place about 1/4 cup of the filling into each cabbage leaf.  Fold in the two outside edges of the cabbage leaf in and roll up the filling.  Place each cabbage roll seam-side down in a 13x9-in. baking pan or dish.
5.  Pour the sauce over the rolls.  Cover with foil and bake for 45 minutes or until the meat is thoroughly cooked to an internal temperature of 160F.  Serve immediately.

Serves:  6 (2 rolls each)
Nutritional Information: 
Calories: 212   Carbohydrate:  17 g   Protein:  20 g   Fat:  7 g   Cholesterol:  77 mg  Fiber:  4 g   Sugar:   9 g   Sodium:  780 mg
Excellent source of:  riboflavin, niacin, vitamin B6, B12, C, A, iron and zinc
Good source of:  omega-3 fatty acid, thiamin, folate, calcium, magnesium, potassium

Friday, July 15, 2011

Foodie Friday: Meatloaf Cupcakes with Sweet Potato Frosting

Meatloaf Cupcakes with Whipped Sweet Potato Frosting
As a mom of two young children, I'm always looking for fresh ways to make food fun and appetizing for my kids.  Earlier this year I learned about this fun twist on good old meatloaf from Registered Dietitian, Joy Bauer, a frequent guest on the Today Show.  This is definitely something I've rotated through my family menu on a regular basis since.  I love that it's a very easy, family-friendly recipe.  It's also great for automatic portion control.  Each cupcake serves up an excellent dose of high quality protein as well as nutrient-rich vegetables. If your kids are old enough, let them help because they're sure to have a blast making these.  Enjoy!

Meatloaf Cupcakes with Whipped Sweet Potato Frosting
Adapted from:  Joy Bauer, 2011

Meatloaf Cupcakes
Ingredients:
1 yellow onion, finely chopped
1 red pepper, finely chopped
2 carrots, peeled and chopped
1.25 lbs lean ground turkey
2 egg whites
1 package taco seasoning mix, preferably reduced sodium (If you have young children, you may want to use a mild mix or make your own milder version.)

Directions:
1.  Preheat oven to 425F.  Liberally coat a muffin pan with oil spray and set aside.
2.  Coat a large skillet with olive oil spray and saute the onions for about 3-5 minutes over medium heat. Add the peppers and carrots and saute for another 8-10 minutes.  Remove from heat and allow to cool to room temperature.
3.  In a large bowl, add the ground turkey, egg whites, and taco seasoning mix.  Mix the ingredients together until they are combined well.  Portion the turkey mixture into 8 muffin cups, smoothing the tops of each mini-meatloaf to make it level.  Bake for 20-25 minutes.  (Note: If a mushy goo forms on the top of the cupcakes, simply wipe it off and discard it after they cool.)

Sweet Potato Frosting
Ingredients:
4 medium sweet potatoes, skin removed
Skim milk
1-2 Tbsp whipped butter
Salt, to taste

Directions: 
1.  Bake or microwave the sweet potatoes.  Mash the potatoes with a splash of skim milk, butter, and salt to taste.  Frost each meatloaf cupcake with the sweet potato mixture.  Enjoy!

Serves: 8 (2 meatloaf cupcakes each serving) 
Nutritional Information:
Calories:  450   Carbohydrate:  50 g   Protein:  35 g   Fat:  12 g   Cholesterol:  105 mg   Fiber:  8 g   Sugar:  19 g (natural)  Sodium:  637 mg
Excellent source of:  thiamin, riboflavin, niacin, vitamin B6, C, A, and potassium.
Good source of:  vitamin E, calcium, iron, magnesium, and zinc.

Thursday, July 14, 2011

Trendy bytes: Anti-energy drinks

Are anti-energy drinks the new way to relax?
Could anti-energy be the new energy?  Numerous beverage companies seem to think so, and that's why we might be seeing more anti-energy drinks, or relaxation beverages, spilling onto the market.  From Slow Cow to Mary Jane's Relaxing Soda, these new beverages are intended to help you unwind, de-stress, and in the word of Frankie Goes to Hollywood, "Relax!"

What are anti-energy drinks?
Think of anti-energy drinks as sodas with active ingredients, such as melatonin, kava, valerian, and even THC, that are intended to help consumers mellow out.  Being the geeky RD that I am, I did test a few of these out, which is so daring given my dislike of liquid calories.  The ones I tried tasted similar to energy drinks.  They're lightly carbonated and are usually sweetened with added sugars, like "evaporated cane juice" or high fructose corn syrup.  The sugar-free or zero-calorie versions typically use alternative sweeteners, like sucralose (Splenda) and stevia.  To me, they only tasted okay.

Do they work and are they safe?
Because they're so new, there seems to be little to no scientific research on the safety or efficacy of anti-energy drinks.  So from a scientific standpoint, their proposed benefits do not appear to be supported by research nor are they refuted by research either. However, there is some evidence on the effectiveness of some of the active ingredients.  The effectiveness will depend on the type and amount of the active ingredient.  Here's a list of some of the most common active ingredients in relaxation beverages and a description of their potential effects.
While some relaxation beverages may contain the recommended dosage of the active ingredient needed for the proposed benefits, many of them do not.  So whether or not these drinks will produce the desired effects is questionable.  My guinea pig husband and I both sampled a few of these drinks, and neither of us felt any more relaxed as a result.

In terms of safety, there are definitely some factors to consider. So far, short-term use of some "relaxing" ingredients seems to be well tolerated without harmful effects at prescribed doses.  However, prolonged use of these ingredients has not been well studied.  Also, combining these ingredients with other over-the-counter, prescription, or herbal sedatives or alcohol is not advised since their sedative effects may be intensified.  Due to safety concerns about excessive use, some relaxation beverages come with a recommended daily limit, which is usually no more than two drinks daily.  In addition, some of the drinks come with warnings advising against driving motor vehicles or operating machinery after consumption.  Concerns have also been raised about the use of these drinks by children, pregnant/nursing women, or those with health conditions, such as liver disease, anxiety, or depression.
 
What's the bottom line?
While the active ingredients in these drinks may have some legitimate effects on sleep and anxiety, there may not even be enough of them in the drinks to produce the desired effects.  On the other hand, there are also some reasonable safety concerns to consider.  If you really need to "slow your roll", I think that there are a lot of better ways to do it than by consuming an anti-energy drink.  Practice yoga.  Try deep-breathing.  Pray.  If a person really needs help relaxing or sleeping, then I'd suggest addressing the underlying causes of the problem first.  If the root cause of the problem is not being addressed, then the drink (given that it works) may only offer a band-aid solution, if anything at all.

Have you seen any of these drinks?  Do you think they'll catch on?

Photo credit: Francis Borgouin via Flickr

Friday, July 8, 2011

Foodie Friday: Cinnamon Swirl Banana Cake

Cinnamon Swirl Banana Cake
I've been testing some new cooking waters lately in order to explore what else is out there...at least outside of the "traditional" stuff.  I'd bought a package of almond flour at Whole Foods a while back with the idea in mind that I'd use it to bake something.  However, I just didn't have the recipe yet. I'd like to say I'm an innovative baker, but I'd be lying.  Then I finally stumbled upon something that sounded simple and tasty.  That is this Cinnamon Swirl Banana Cake.  This is exactly what I was looking for...a grain-free and milk-free breakfast option.  Easy, nutritious, satisfying, and the kids like it.  These store in the fridge well, so you can enjoy them for a few days.  I hope you enjoy it, too!

Cinnamon Swirl Banana Cake
Adapted from: Paleo on Main Street, 2011

Ingredients for cake:
3 ripe bananas, mashed
1 cup almond flour (aka, almond meal)
1/4 c coconut flour
1 tsp pure vanilla extract
1 tsp baking powder
1 tsp baking soda
3 eggs
1 Tbsp 100% pure maple syrup
1/2 c walnuts

Ingredients for cinnamon swirl:
1 ripe banana
1-2 Tbsp ground cinnamon (I use 1 Tbsp.)

Directions:
1.  Preheat oven to 350F.  Coat 8x8 baking pan with coconut oil.  (I place about 1/2 Tbsp of coconut oil in the baking pan and pop it in the oven for 1-2 minutes to let it melt and spread to coat the pan.)
2.  Mix all of the cake ingredients, except the walnuts, in a medium bowl.  Fold in the walnuts last.  Pour the mixture into the pan.
3.  For the cinnamon swirl, mash the banana and cinnamon together in a small bowl.  Drop dollops of the mixture on top of the cake mixture in the pan.  Cut through each dollop with a knife for the "swirl" effect.

  
4.  Place the pan in the oven for 30 minutes or until a toothpick comes out clean.  Allow to cool slightly and enjoy.

Serves: 9
Nutritional Information:  
Calories: 251   Carbohydrate:  19 g   Fat:  17 g   Protein:  8 g   Cholesterol:  70 mg   Fiber:  4 g   Sugar:  9 g   Sodium:  166 mg
Excellent source of:  vitamin B6 and E
Good source of:  omega 3 fatty acid, riboflavin, vitamin B12, and magnesium  

Thursday, July 7, 2011

What you need to know about pre-workout hydration

Are you drinking enough of this before your workouts?
If you'd like to make every workout the best one possible, then make sure you're well hydrated before you even start.  I find that people often put fluid intake toward the bottom of the totem pole when it comes to pre-exercise nutrition.  However, that's a big mistake because it is one key element to taking your workout to the next level.  While you may not notice how your hydration status affects your physical performance, your body does.

Why does pre-workout hydration matter?  
Entering a workout even mildly dehydrated (a loss of 2% of body water) can be very taxing on the body and can hinder physical performance, especially in warm or hot environments.  Water serves several vital purposes during activity, including delivering oxygen and nutrients to the muscles, helping to regulate body temperature, and removing metabolic waste products generated during exercise.  Without adequate hydration to start, the body experiences greater physiological strain as the heart has to work harder and the body has a harder time cooling down.  It also saps the body of energy leaving one not only physically but also mentally drained.  How hard do you think you can push yourself when you're feeling like this?  

I hydrate during my workout, so I don't need to worry about pre-workout hydration, right?
Making sure you're well hydrated as much as several hours before a workout allows the body time to better absorb the fluid that was consumed.  When you make sure you're adequately hydrated before exercise you're priming your body for the best workout possible.  Who doesn't want to be able to work out harder, faster, longer, or with greater focus?  And what if some of the symptoms of dehydration, such as a headache or fatigue, before a workout are the very things that are keeping you from actually doing it?  Make sure all of your ducks are in a row!

How do I know if I'm adequately hydrated before my workout?
Thankfully, there are a few simple signs that you can look for to roughly determine whether or not you're well hydrated before your workout.  
  • Thirst is one of the first signs of dehydration, so make sure you're not thirsty before your workouts.  
  • A dry, sticky mouth can also be a sign of dehydration.  If you're experiencing this, drink up.  
  • You can also check the color of your urine.  If it's clear to pale yellow (like lemonade) in color, then you're probably adequately hydrated.
For more info on hydration during your workout, you may want to check out this blog post.

How do you make sure that you're well hydrated for your workouts?

If you're concerned about your physical performance and feel that you'd benefit from a personalized hydration or performance nutrition plan, then you may want to consider consulting a sports dietitian. You can search for one in your area here

Photo credit:  Darwin Bell via Flickr

Friday, July 1, 2011

Foodie Friday: Very Cherry Bars

The very delicious and very easy-to-make Very Cherry Bar
If you've ready my blog before, then you may know how much I value planning in achieving and maintaining nutrition, health, and fitness goals.  If you've taken a look at our environment lately, you'll see that we have a multitude of less nutritious food options available to us.  So when we're caught in a bind and we haven't planned ahead, we can be left in some very challenging spots.  This is why I try to set up my own personal environment for success.  This includes taking along nutritious snacks with me everywhere I go.  I also keep emergency foods, like energy bars, on hand for those times that I really need it.  One of my fave go-to bars is the Larabar. What I love about them is that they contain very simple, whole food ingredients, usually 5 or less.  These bars usually run anywhere between $1.50-2.00, and I recently thought, "Can't I make these myself?".  Thank to Google I found several different "recipes" for homemade Larabars. I couldn't be more excited.  So today I'm sharing with you my first version, the Very Cherry Bar, which I modified from Enlightened Cooking.  They literally taste just like the Cherry Pie Larabar for about half the price!  In fact, my husband tried them, and he thinks they taste better than the real thing.  What you'll love about them is that they are super easy to make.  There are only 4 ingredients and NO cooking!  It usually takes me less than 15 minutes to make these. I cannot wait to play with this recipe more and see what other combinations I can come up with.  Let me know if you try them out.  Enjoy!

Very Cherry Bar
Adapted from:  Enlightened Cooking, 2008     

Ingredients:
1/2 c whole dates, roughly chopped
1/2 c unsweetened dried cherries
1/2 c whole walnuts
1/4 tsp ground cinnamon

Directions:
1.  Set out four pieces of plastic wrap that will be used later for wrapping the bars.  It's easier to do this before your hands get sticky.
2.  Combine the dates and dried cherries in a food processor.  Process until it turns into a paste. It will eventually take the shape of a ball as you process it.  Remove the date-cherry mixture to a medium bowl.     

The date and dried cherry paste
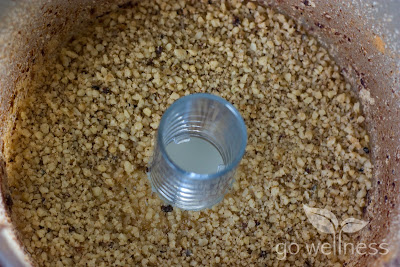
3.  Place the walnuts into the food processor and process until finely chopped (not into a flour).  

The chopped walnuts
4.  When finished, add the walnuts and cinnamon to the date-cherry mixture.  Using your fingers/hands, combine the nuts with the date-cherry mixture.  Divide the mixture into four equal parts.  Form each part into a small brick or bar.  If you want to make them smaller for mini-bars, then divide the mixture into eight equal parts and go for it!
5.  Place each bar onto the plastic wrap and wrap tightly.  Then place in the fridge for at least 15 minutes or so before enjoying.

The finished product!
Serves:  4
Nutritional Information:  
Calories:  208   Carbohydrate:  31 g   Protein:  3 g   Fat:  10 g   Cholesterol:  0 mg   Fiber:  4 g   Sugar:  25 g Sodium:  0.75 mg
Excellent source of:  omega-3 fatty acids
Good source of:  vitamin B6 and magnesium
Related Posts with Thumbnails